Stop Crawl Space Moisture Before It Damages Your Foundation
Standing water, damp soil, musty odors, and peeling insulation signal that moisture is collecting beneath your home. A wet crawl space can attract mold, rot wood framing, corrode metal supports, and weaken foundation components. Moisture can also move into living areas, making floors feel damp and worsening indoor air quality.
A properly installed crawl space moisture barrier helps control ground vapor, but it is only one part of a complete moisture control plan. Homeowners also need to address drainage, plumbing leaks, ventilation, and foundation cracks.
Why Crawl Space Moisture Threatens Your Home
Most crawl space moisture comes from soil evaporation, surface water, plumbing leaks, or humid outdoor air entering through vents. When warm, damp air reaches cooler surfaces, condensation forms on ducts, pipes, joists, and foundation walls.
Wood framing exposed to persistent moisture can develop fungal decay. Termites and other pests also prefer damp conditions. In severe cases, saturated soil can increase pressure against foundation walls or contribute to settlement around footings.
A vapor barrier limits moisture rising from exposed soil. It does not repair a leaking foundation or remove standing water. That distinction matters because covering an active leak can hide the source while damage continues.
Inspect the Crawl Space First
Inspect the area after heavy rain and look for these warning signs:
- Puddles or muddy soil
- Damp foundation walls
- White powdery deposits on masonry
- Sagging or wet insulation
- Mold growth or musty odors
- Rusted support posts or hangers
- Plumbing drips and sweating pipes
- Wet wood, soft joists, or insect activity
Use a moisture meter on wood framing when possible. Wood readings above roughly 20 percent deserve attention, especially when readings remain elevated across multiple inspections. A building professional can test conditions more accurately and identify hidden damage.
Check gutters, downspouts, grading, and exterior drains before installing a barrier. Water should flow away from the foundation, not collect beside it.
Choose the Right Crawl Space Moisture Barrier
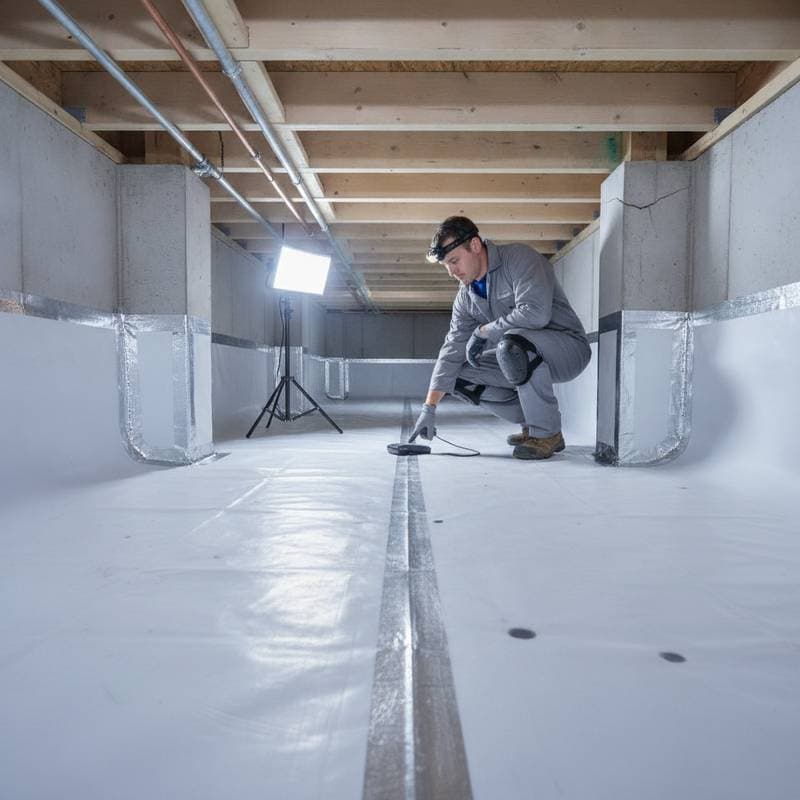
A crawl space vapor barrier is usually made from polyethylene sheeting. Thin plastic tears easily during installation, so a reinforced product with a thickness of at least 10 mil is a practical choice for many homes. A thicker, reinforced liner may last longer in spaces with sharp rocks, frequent access, or difficult soil.
Compare products by these factors:
- Thickness and reinforcement. Heavier liners resist punctures.
- Seam design. Wide overlapping seams make taping easier.
- Wall attachment. Compatible fasteners and termination bars improve sealing.
- Mold resistance. Some products include antimicrobial treatments.
- Warranty terms. Read installation requirements before buying.
A basic DIY vapor barrier project may cost about $500 to $2,000 for materials and equipment. Professional vapor barrier installation commonly ranges from $2,000 to $8,000, depending on crawl space size, access, cleanup, wall height, drainage needs, and liner quality. Encapsulation systems with sealed vents, insulation, a dehumidifier, and a sump pump cost more.
Vapor Barrier Installation Steps
A capable DIY homeowner can install a ground barrier when the crawl space is accessible, dry, and free of structural problems. Plan on one to three days, depending on the area and cleanup required. The project has a moderate difficulty rating because working in a tight space is physically demanding.
1. Correct Water Sources
Repair leaking supply lines, drain pipes, hose bibs, and HVAC condensate lines. Extend downspouts away from the foundation and correct soil that slopes toward the house. Do not install plastic over standing water.
2. Prepare the Soil
Remove sharp stones, construction debris, roots, and loose objects. A smooth surface reduces punctures. Keep necessary access to plumbing, electrical equipment, and support posts.
3. Measure and Cut the Material
Measure the floor, walls, piers, and seams. Allow enough material to extend up foundation walls and overlap adjoining sheets. Cut sections outside the crawl space when possible to reduce handling.
4. Cover the Ground
Lay the barrier across the entire exposed soil surface. Overlap seams by at least 12 inches, then seal them with compatible vapor barrier tape. Keep the material flat and avoid gaps around corners.
5. Seal Walls and Supports
Extend the barrier up foundation walls. Use compatible adhesive, termination bars, or fasteners designed for the wall material. Seal around piers and posts with carefully fitted pieces. Do not block required drainage paths or cover active structural movement.
6. Protect the Finished Barrier
Use boards or temporary walkways when servicing equipment. Avoid dragging tools across the liner. Inspect the material after plumbing, electrical, or HVAC work and repair punctures with compatible patches.
When to Hire a Professional
Call a foundation contractor, waterproofing specialist, or qualified building professional when you find standing water, major cracks, bowed walls, rotten framing, sewage leaks, or widespread mold. Professional help is also appropriate when the crawl space is too low to enter safely.
A contractor should explain the water source, proposed drainage method, liner specifications, ventilation plan, and warranty. Ask whether the estimate includes cleanup, mold treatment, insulation removal, sump equipment, and permits where required. Be cautious of any proposal that recommends sealing the floor without addressing active water intrusion.
Building departments may follow local requirements based on the International Residential Code. Rules can affect vapor retarder materials, ventilation, combustion air, access openings, and mechanical dehumidification. Verify requirements with your local authority before sealing vents or altering foundation components.
Troubleshooting Common Problems
The crawl space still smells musty. Look for wet insulation, untreated wood, mold, or trapped moisture above the barrier. A dehumidifier may be needed after leaks are corrected.
Water appears on top of the liner. The barrier is not the source of the water. Check plumbing, foundation cracks, groundwater, and exterior drainage.
The plastic keeps tearing. Use thicker reinforced material, remove sharp debris, and create protected paths to equipment.
Condensation covers ducts and pipes. Improve moisture control, insulate cold surfaces, and use a properly sized dehumidifier when necessary.
Maintain Your Crawl Space Year Round
Inspect the crawl space at least twice each year and after severe storms. Keep gutters clear, confirm that downspouts discharge away from the house, and watch for new cracks or changes in floor level. Replace damaged tape and patch liner punctures promptly.
A sealed crawl space works best when paired with reliable drainage, controlled humidity, and regular inspections. Addressing moisture early costs less than replacing damaged joists, treating mold, or repairing foundation movement. Start with the water source, choose a durable crawl space moisture barrier, and bring in a professional when the problem involves structure or persistent flooding.