Beat the Heat: Essential AC Prep Checklist for 2025
Summer heat demands reliable cooling from your air conditioner, which serves as the core of home comfort during warm months. Homeowners often delay activation until the first intense heatwave, leading to performance issues or complete failures. Advance preparation avoids expensive repairs, enhances operational efficiency, and reduces energy consumption throughout the season. This comprehensive checklist provides step-by-step guidance to ensure your system delivers consistent cooling.
Data from energy efficiency studies indicates that proper pre-season maintenance can prevent up to 25 percent of typical energy waste associated with neglected AC units. Follow these steps to achieve optimal performance and lower utility costs.
Step 1: Conduct a Visual Inspection of the Outdoor Unit
Start by examining the outdoor condenser unit, located typically in the yard or on a side of the home. Remove accumulated leaves, grass clippings, dirt, and other debris that obstruct airflow. Efficient cooling requires unobstructed circulation, so clear at least two feet of space on all sides of the unit.
Inspect the coils for bent fins or signs of physical damage, which can impede heat exchange. Use a garden hose with low-pressure water to rinse away surface dirt, taking care not to bend the delicate aluminum fins. Additionally, verify the stability of the unit's base pad; an uneven foundation causes vibrations that stress refrigerant lines and internal components. Level the pad with shims or a layer of gravel if necessary to minimize wear.
Difficulty: Easy
Estimated time: 30 minutes
Cost: Free for self-performed tasks
Step 2: Clean or Replace Air Filters
Air filters trap dust, pollen, and particles, but they become clogged over time, restricting airflow and forcing the system to work harder. A dirty filter alone can increase energy use by 5 to 15 percent. Locate the filter in the return air duct, furnace, or air handler, usually accessible via a panel in the home's interior.
Remove the old filter and hold it up to light; if little light passes through, replacement is essential. Select a filter with a MERV rating of 8 to 13 for balanced filtration without excessive resistance. Slide the new filter into place, ensuring the arrow on the frame points toward the airflow direction. Perform this task now and plan monthly checks during the cooling season.
Difficulty: Easy
Estimated time: 15 minutes
Cost: $10 to $20 per filter
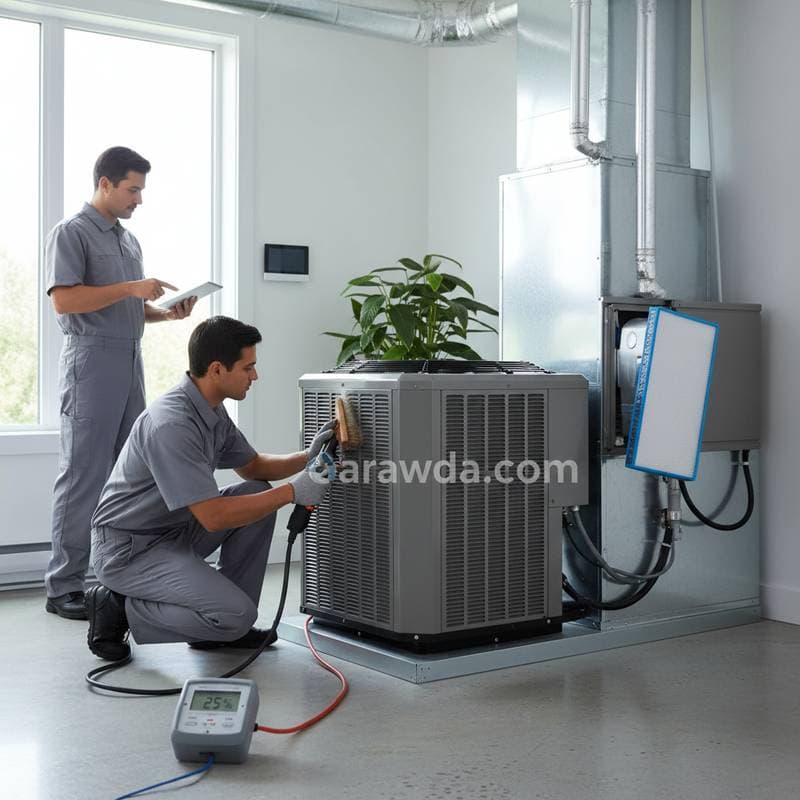
Step 3: Clean the Evaporator and Condenser Coils
Dust and grime accumulate on both the indoor evaporator coil and outdoor condenser coil, reducing heat transfer efficiency by as much as 15 percent with even a thin layer. For the indoor evaporator coil, first shut off power to the system at the breaker panel to ensure safety. Remove the access panel on the air handler and apply a commercial no-rinse coil cleaner spray, which foams to loosen debris and drains into the condensate pan.
Address the outdoor condenser coil with a soft-bristle brush to dislodge dirt, followed by a gentle rinse using a hose. Avoid high-pressure washers, as they risk damaging the fins. Allow both coils to dry fully before restoring power, which prevents electrical hazards and ensures immediate functionality.
Difficulty: Moderate
Estimated time: 1 hour
Cost: $15 to $50 for cleaning supplies
Step 4: Test and Calibrate the Thermostat
The thermostat controls the entire system, and inaccuracies lead to overcooling or insufficient operation, wasting energy. Replace batteries in battery-powered models to maintain precise readings. For programmable or smart thermostats, verify settings align with your schedule, setting a baseline temperature of 78 degrees Fahrenheit for efficiency during occupied hours.
Run a test cycle by adjusting the temperature downward and observing system response. Listen for the compressor engaging smoothly without delays or unusual sounds. If the thermostat appears faulty or unresponsive, consider upgrading to a model with energy-saving features like auto-scheduling or remote access via an app.
Difficulty: Easy to moderate
Estimated time: 20 minutes
Cost: Free for testing; $50 to $150 for a new thermostat
Step 5: Inspect Ductwork and Vents
Leaky or blocked ducts represent a primary source of energy loss, with inefficiencies reaching 20 percent in poorly sealed systems. Traverse your home to confirm all supply and return vents remain open and free of furniture, rugs, or accumulated dust. Examine registers for moisture stains or excessive dust, indicators of leaks or poor insulation.
Seal any visible gaps in accessible duct sections using foil-backed tape or mastic sealant, which provides durable adhesion. In older homes or complex setups, hire an HVAC professional for a pressure test to detect and repair hidden leaks. Proper duct integrity ensures cooled air reaches intended spaces without loss.
Difficulty: Moderate
Estimated time: 1 to 2 hours
Cost: $20 for DIY materials; $200 to $400 for professional inspection
Step 6: Check Drainage and Electrical Components
Clogged condensate drains cause water backups, leading to mold growth and system shutdowns via safety switches. Locate the drain line, often a PVC pipe exiting near the indoor unit, and flush it with a vinegar-water solution to dissolve buildup. Install a condensate overflow switch if absent, as it prevents water damage.
Inspect electrical connections for loose wires or corrosion, which pose fire risks and reduce performance. Tighten visible terminals with a screwdriver, but avoid handling high-voltage components without expertise. These checks maintain safe operation and prevent intermittent failures.
Difficulty: Moderate
Estimated time: 45 minutes
Cost: $10 for cleaning solutions; professional electrical work varies
Step 7: Arrange a Professional Tune-Up
DIY efforts provide a strong foundation, yet a certified HVAC technician offers comprehensive diagnostics beyond basic access. The service encompasses verifying refrigerant levels, securing electrical connections, evaluating safety controls, and assessing airflow metrics. Experts detect subtle issues in compressors or fan motors early, averting major breakdowns.
Home service data shows tune-up costs average $100 to $200, influenced by system size and location. This proactive measure yields returns through reduced energy bills and extended equipment life, often offsetting the expense within one season.
Difficulty: Professional service required
Estimated time: 1 hour
Cost: $100 to $200
Pro Tips for Long-Term Efficiency
Establish monthly reminders for filter inspections to sustain airflow. Trim vegetation around the outdoor unit regularly to avoid shading or blocking. Track monthly energy bills for anomalies that suggest emerging problems. Maintain a log of all maintenance activities to monitor patterns and comply with warranty terms.
Sustaining Peak Performance Year-Round
After initial preparation, ongoing vigilance ensures your AC operates at maximum efficiency. Conduct a mid-season review to refresh filters and clear drains once more. Remain alert to atypical sounds, weak airflow, or rising humidity levels, which signal potential concerns.
Investing time in these steps secures reliable cooling, minimizes disruptions, and preserves your system's value. A meticulously maintained air conditioner delivers comfort while optimizing energy use and protecting your home investment.


