Essential Fall HVAC Preparation to Prevent Costly Winter Repairs
A sudden cold front often catches homeowners unprepared when their heating systems falter under the strain. Many discover the limitations of their furnace or heat pump only after temperatures plummet. Fortunately, targeted maintenance during the fall season can avert such issues. This preparation not only ensures comfort but also reduces expenses, prolongs equipment durability, and eliminates the need for urgent winter interventions.
Why Fall HVAC Preparation Matters
Heating systems accumulate dust and debris during the warmer months of inactivity. Filters become obstructed, and components like belts may slacken. When heating demands increase, these minor concerns escalate into significant malfunctions. A well-maintained system operates with greater efficiency, consumes less energy, and endures longer service life.
Experts in energy conservation note that routine upkeep can enhance HVAC performance by as much as 20 percent compared to neglected units. This improvement directly lowers utility expenses and minimizes the risk of breakdowns. The objective remains straightforward: prepare the system before it faces peak operational demands.
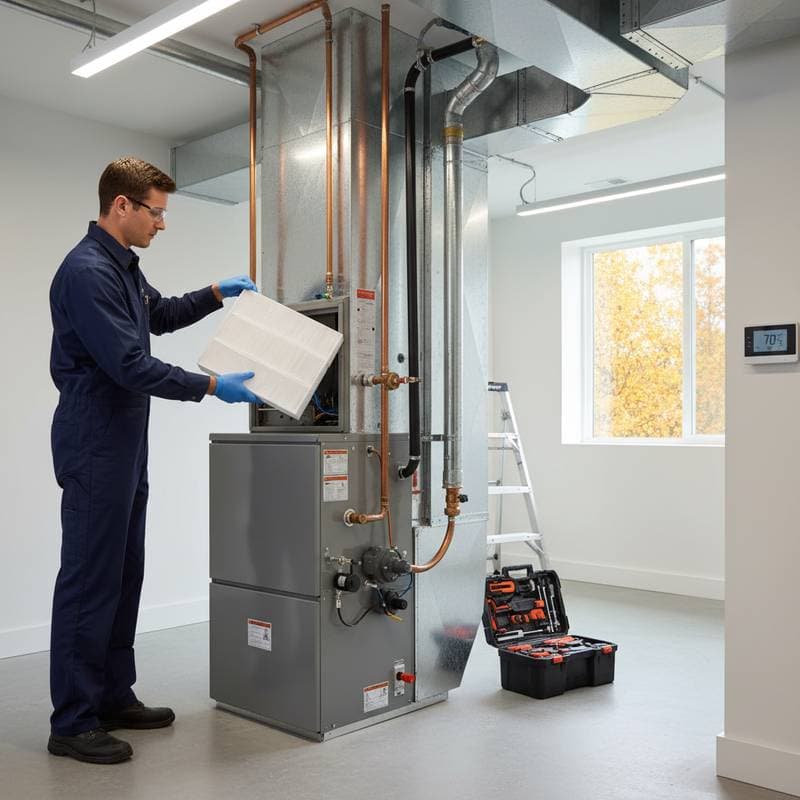
Essential Fall HVAC Checklist
For those with limited time, prioritize these core actions:
- Replace or clean air filters to ensure optimal airflow.
- Vacuum supply and return vents to remove accumulated dust.
- Verify thermostat accuracy for precise temperature control.
- Inspect the furnace flame for a steady blue color.
- Arrange a professional tune-up to address hidden issues.
These steps target the primary sources of winter HVAC disruptions. Completion of these tasks allows progression to more comprehensive procedures.
Step 1: Replace or Clean Filters
A clogged filter represents the leading cause of furnace overheating and early failure. Restricted airflow compels the blower motor to strain, which elevates energy consumption and accelerates wear. For disposable filters, perform replacements every one to three months. Washable filters require thorough rinsing with warm water, complete drying, and careful reinstallation.
Select filters with MERV ratings from 8 to 11 for typical residential applications. Higher ratings capture smaller particles yet may impede airflow in systems not equipped to handle them. Consult the furnace manual to confirm the suitable rating range.
Step 2: Clean Supply and Return Vents
Obstructed vents disrupt the system's overall balance. Use a vacuum cleaner equipped with a brush attachment to clear vents, and ensure no furniture or drapery blocks access. Maintain at least six inches of clearance around each vent to facilitate unrestricted air circulation. Focus extra effort on return vents located near floors or in hallway corners, as these areas gather the heaviest dust buildup.
Step 3: Inspect Thermostat Operation
The thermostat dictates the frequency of furnace activation. Inaccurate calibration leads to excessive fuel use or inconsistent heating. Position a trusted thermometer adjacent to the thermostat for a ten-minute comparison. If readings differ by more than two degrees, adjust the calibration or consider a replacement. Programmable or smart thermostats offer added benefits, such as automatic adjustments during absences, which further conserve energy.
Step 4: Check the Furnace Flame
Observe the flame through the inspection port on a gas furnace; it should display a consistent blue hue. Yellow or unsteady flames signal incomplete combustion, resulting in fuel inefficiency and potential carbon monoxide hazards. Shut down the system promptly and contact a qualified professional upon detecting such irregularities. Only licensed technicians should address gas connections or burner adjustments.
Step 5: Schedule a Professional Tune-Up
A standard fall tune-up ranges from 80 to 150 dollars for residential setups, yet it averts repairs that could cost several times more. Technicians perform the following during the service:
- Lubricate all moving components.
- Secure electrical connections.
- Evaluate system controls.
- Assess carbon monoxide concentrations.
- Examine heat exchangers for any fissures.
This thorough check also verifies adherence to local building codes, including proper venting and combustion evaluation.
Common Mistakes to Avoid
Well-intentioned homeowners occasionally overlook details that lead to substantial complications.
- Neglecting filter replacements permits dust to encase coils and fans.
- Shutting excessive vents to reroute airflow risks overpressurizing ductwork.
- Dismissing unusual sounds overlooks indicators of issues like deteriorated bearings or slack belts.
- Installing an ill-fitting filter creates gaps that allow contaminants to circumvent filtration.
Steering clear of these pitfalls ensures reliable and efficient HVAC operation.
Accessibility and Safety Considerations
For households with members who have mobility challenges, position filters and thermostats at accessible elevations. Install thermostats 48 to 52 inches above the floor to accommodate easy reach. Employ step ladders featuring handrails and firm bases when cleaning vents or changing filters. Individuals sensitive to respiratory irritants should don a dust mask during filter handling or vent vacuuming.
DIY Versus Professional Maintenance
Certain preparation tasks suit DIY efforts, while others demand expert intervention due to required tools or expertise.
| Task | DIY Friendly | Professional Recommended |
|---|---|---|
| Filter replacement | Yes | No |
| Vent cleaning | Yes | No |
| Thermostat calibration | Yes | Optional |
| Flame inspection | Visual only | Yes |
| Duct leak testing | No | Yes |
| Blower lubrication | No | Yes |
Homeowners can manage basic cleaning and filter maintenance independently. However, tasks involving gas lines, electrical wiring, or internal motors necessitate a certified HVAC specialist.
Cost and Energy Benefits
Investing in preventive care yields rapid returns. An optimized HVAC setup can decrease heating expenses by 10 to 15 percent via enhanced airflow and combustion processes. Repairing a furnace motor or blower assembly incurs costs of 400 to 700 dollars, whereas a tune-up that forestalls such needs expenses far less. Consistent servicing extends system lifespan by multiple years, postponing the purchase of a replacement furnace priced between 3,000 and 6,000 dollars.
Preparing for Special Conditions
Homes vary in their winter demands. In structures with aging, uninsulated ductwork, apply mastic sealant or foil-backed tape to seal leaks, potentially boosting efficiency by 20 percent. For heat pump installations, clean the outdoor coil and confirm adequate refrigerant levels. In regions with severe cold, integrate a supplementary electric or gas heating option to support the primary system during extreme freezes.
Households prone to allergies benefit from incorporating whole-home air purifiers or UV lighting systems, which maintain cleaner air circulation amid prolonged winter operation.
Tools Required for Fall Preparation
Gather these basic items to streamline and secure the maintenance process:
- Vacuum cleaner with brush and crevice attachments.
- Screwdriver set for access panel removal.
- Digital thermometer for thermostat verification.
- Flashlight for inspecting furnace components.
- Dust mask and gloves for personal protection.
- Step ladder for reaching elevated areas.
These tools enable safe execution of DIY tasks without unnecessary complications.
Realize Lasting Winter Comfort
Implementing these fall strategies transforms potential winter woes into seamless heating performance. Homeowners gain peace of mind knowing their systems operate at peak efficiency, delivering consistent warmth while minimizing costs and environmental impact. Begin the preparation today to enjoy a reliable, economical heating season ahead.


