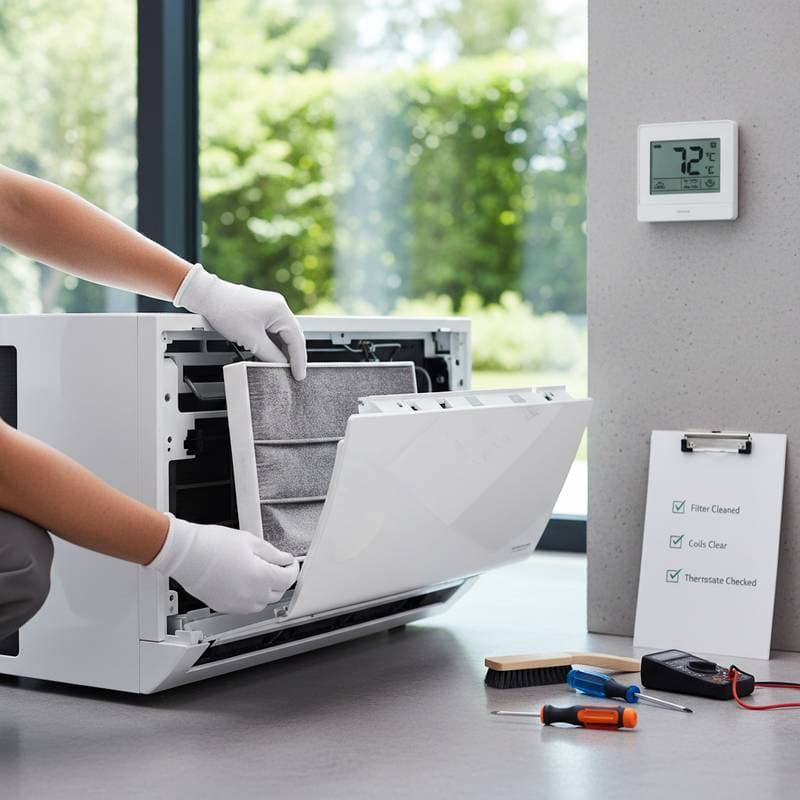
- Replace or clean the air filter
- Clear debris from the outdoor condenser unit
- Inspect refrigerant lines and insulation
- Test the thermostat and electrical connections
- Verify airflow from all vents
- Schedule professional service for any irregularities
Detailed instructions follow for each step.
Step 1: Replace or Clean the Air Filter
A dirty filter hampers airflow and strains the system, leading to inefficiency and potential coil freezing.
Required Tools
- New filter matching your unit's specifications, typically 16x20x1 or 20x25x1 inches
- Screwdriver for accessing the return grille
- Vacuum cleaner or damp cloth to remove surrounding dust
Procedure
- Switch off the system at the thermostat.
- Extract the old filter and observe the airflow arrow on its frame.
- Install the new filter with the arrow directed toward the blower motor.
- Reset the filter replacement indicator on the thermostat if applicable.
Expert Advice
Households with pets or heavy dust accumulation require filter changes every 30 to 45 days. Standard homes suffice with replacements every 60 to 90 days. Proper filtration boosts efficiency by as much as 10 percent.
Step 2: Clear the Outdoor Condenser Unit
The outdoor unit expels heat, but obstructions like leaves or debris impede this function.
Cleaning Process
- Disconnect power at the unit's service switch.
- Remove loose debris manually, then rinse the fins gently with a hose, directing water from inside to outside.
- Maintain 24 inches of clearance around the sides and 60 inches above the unit.
- Trim nearby vegetation to prevent encroachment.
Key Observations
Examine for bent fins, which diminish performance; straighten them with a fin comb or blunt tool. Oily or discolored coils suggest a refrigerant leak, necessitating expert intervention.
Step 3: Examine Refrigerant Lines and Insulation
These lines transport refrigerant between units, insulated to preserve efficiency.
- Verify insulation integrity; replace damaged sections with foam sleeves designed for refrigerant lines.
- Look for frost or oily spots indicating leaks or low levels.
- Ensure connections remain secure without bends or kinks.
Insufficient refrigerant prolongs operation and causes inconsistent cooling. Professionals alone handle recharges, but early detection averts severe damage.
Step 4: Test the Thermostat
As the system's controller, the thermostat demands accuracy for optimal performance.
Testing Method
- Select cool mode and decrease the setting by 3 to 5 degrees.
- Confirm the unit activates promptly.
- If unresponsive, inspect batteries or breakers.
- For connected models, verify network stability and software updates.
Upgrade Suggestion
Replace outdated thermostats with programmable or intelligent versions. Such devices lower energy consumption by up to 8 percent through automated adjustments during absences.
Step 5: Assess Airflow at Vents
Inadequate distribution signals underlying issues in cooling delivery.
- Traverse rooms to ensure consistent flow from each vent.
- Detach covers and vacuum accumulated dust.
- Confirm no furniture or carpeting obstructs outlets.
- Clear blockages from return grilles.
Persistent warmth in areas may indicate duct leaks. Apply mastic sealant or foil tape to ducts for up to 20 percent efficiency gains.
Step 6: Review Electrical Components
Faulty wiring leads to unreliable operation or safety risks.
Inspection Guidelines
- De-energize at the main breaker.
- Access the condenser's panel with a screwdriver.
- Identify frayed, burned wires or pest intrusions.
- Secure loose connections and clean with a dry cloth.
Evidence of melting or scorch marks requires immediate professional evaluation to mitigate fire risks.
Step 7: Clean the Condensate Drain Line
Clogs in this line cause water backups, risking damage and odors.
Cleaning Technique
- Find the line exiting the indoor handler.
- Uncork the access tee.
- Introduce one cup of white vinegar or a diluted bleach solution.
- Flush with a gallon of warm water.
- Secure the cap and clear the exterior outlet.
A vacuum attachment enhances thoroughness. Regular clearing prevents overflows.
Step 8: Conduct a Comprehensive System Test
Post-maintenance, operate the unit for 15 minutes and evaluate:
- Smooth, quiet outdoor fan rotation.
- Cooled vent output within minutes.
- Absence of excessive frosting or condensation on the indoor coil.
- Stable temperature control by the thermostat.
Irregularities like warm output or frequent cycling warrant expert service before peak demand.
Pitfalls in AC Maintenance
Homeowners often commit errors that compromise system longevity:
- Overlooking filters: Leads to restricted flow and coil damage.
- Bypassing yearly checks: Allows minor faults to escalate.
- Obstructing the condenser: Impairs heat dissipation.
- Ignoring calibration: Increases runtime unnecessarily.
- Mismatched filters: Permits unfiltered air circulation.
Steer clear of these to sustain optimal function.
Indicators for Professional Assistance
DIY suits basic tasks, yet complex problems demand specialists. Seek help for:
- Frozen evaporator coils
- Unusual grinding or rattling sounds
- Persistent warm discharge
- Accumulated water near the handler
- Frequent on-off cycles or breaker trips
Routine professional visits range from 80 to 150 dollars, encompassing refrigerant analysis, electrical verification, and tuning. This investment prolongs unit lifespan and curbs future expenses.
Enhancing Accessibility and Comfort
For residents with limited mobility, precise temperature control proves vital. Position thermostats at 48 inches from the floor for easy access. Integrate voice-activated or app-based controls. In multi-level dwellings, zoning systems ensure even cooling without excess energy use.
Strategies for Cost Savings and Efficiency
Combine maintenance with habits to minimize expenses:
- Close blinds against midday sun to limit heat entry.
- Employ ceiling fans to permit higher settings while feeling cooler.
- Weatherstrip doors and windows to seal drafts.
- Add attic insulation for sustained indoor coolness.
- Adopt adaptive smart thermostats aligned with routines.
Integrated practices yield 10 to 25 percent reductions in seasonal cooling costs.
Essential Tools for Home Maintenance
Basic items suffice for most procedures:
- Screwdriver assortment
- Fin straightening tool or butter knife
- Wet/dry vacuum
- Garden hose
- Spare filters
- Flashlight
- Protective gloves and eyewear
Sustain Reliable Cooling Through the Season
Thorough preparation equips your AC for enduring performance. Regular attention prevents disruptions and optimizes comfort. Implement these steps to enjoy consistent relief from summer heat.


