Why Frozen Pipes Create Serious Problems
When water freezes inside pipes, it expands and increases internal pressure until the pipe cracks or bursts. A single break can release gallons of water within minutes and lead to expensive repairs for walls, floors, and belongings. Prevention requires attention to vulnerable spots before temperatures fall.
Locations That Need Early Attention
Examine these areas first because they lose heat fastest:
- Crawl spaces and basements that lack adequate insulation
- Garages sharing walls with water lines
- Cabinets in kitchens and bathrooms that hide pipes along exterior walls
- Outdoor spigots and hose bibs left exposed
- Attics and exterior walls with thin insulation layers
Identifying these zones allows targeted protection rather than scattered efforts.
Step-by-Step Prevention Actions
-
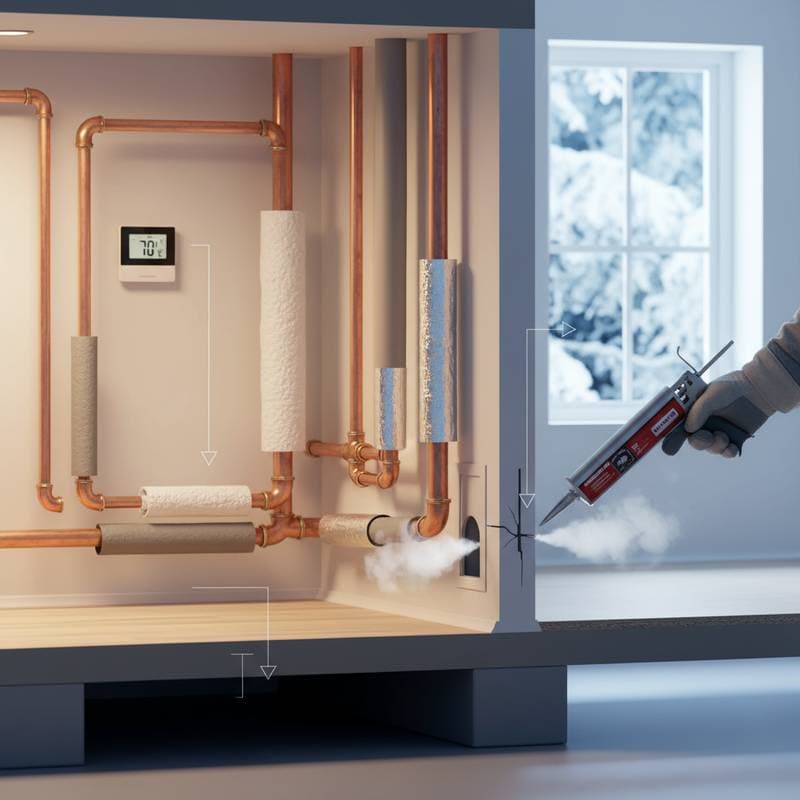
Insulate exposed pipes. Slide foam sleeves or wrap fiberglass around every visible line in unheated spaces. Seal corners and joints with weatherproof tape to trap warmth near the pipe surface.
-
Close air leaks. Apply caulk or expanding foam around vents, windows, and outlets near pipes. Even narrow gaps allow cold air to reach lines and drop temperatures quickly.
-
Maintain steady indoor heat. Keep the thermostat at the same setting both day and night. Avoid large drops that stress pipes during overnight hours, and leave the system above freezing when the house will be vacant.
-
Open cabinet doors. In rooms that stay cooler, leave doors under sinks open so warm air circulates around hidden pipes.
-
Allow faucets to drip. Open cold-water taps connected to exterior walls just enough for a steady trickle. Moving water resists freezing and reduces pressure buildup.
-
Remove outdoor hoses. Disconnect each hose, drain it fully, and store it indoors. Cover the spigot with an insulated sleeve for added protection.
-
Install heating cables where needed. Wrap self-regulating cables around high-risk pipes and plug them into outlets equipped with ground-fault protection. Follow the product instructions for spacing and operation.
-
Locate the main shutoff valve. Confirm it turns easily and mark its position so water can be stopped immediately if a pipe fails.
Weighing Prevention Costs Against Repairs
Basic insulation costs little per foot of pipe. Heating cables represent a one-time purchase for critical sections. A professional inspection before winter provides added assurance at modest expense. These steps remain far less costly than water damage restoration.
Safe Response to Frozen Lines
Never apply open flame to thaw pipes. Use a hair dryer or space heater at a safe distance from water and flammable materials. If flow remains restricted after warming attempts, shut off the main supply and contact a plumber.
When Professional Help Becomes Necessary
Persistent freezing, reduced water pressure, or visible bulging in a pipe requires licensed assistance. Plumbers possess tools to trace and repair issues without further harm to the system.
Practical Outcome From One Home
A homeowner in a cold climate repeatedly dealt with frozen lines in a detached garage. After adding pipe sleeves, sealing nearby gaps, and placing a small heater on a timer, the freezes stopped. The total outlay stayed well below the cost of one prior repair.
Schedule Ongoing Checks
Record insulation inspections on a seasonal calendar. Replace damaged sleeves or tape promptly. When heating equipment is updated, verify that all plumbing areas continue to receive adequate warmth. Consistent attention keeps pipes intact through every cold season.