Key Fall HVAC Tasks for Optimal 2025 Heating
As temperatures decline, homeowners turn their attention to heating systems. Fall presents the perfect opportunity to ready HVAC equipment for impending cold. Thoughtful preparation averts failures, trims energy expenses, and safeguards against unforeseen disruptions. Homeowners can perform basic upkeep independently or enlist experts, but familiarity with core procedures yields substantial benefits in reliability and savings.
This resource details vital fall HVAC actions for steadfast performance. It integrates professional insights, DIY checklists, and hands-on methods to support smooth winter operation.
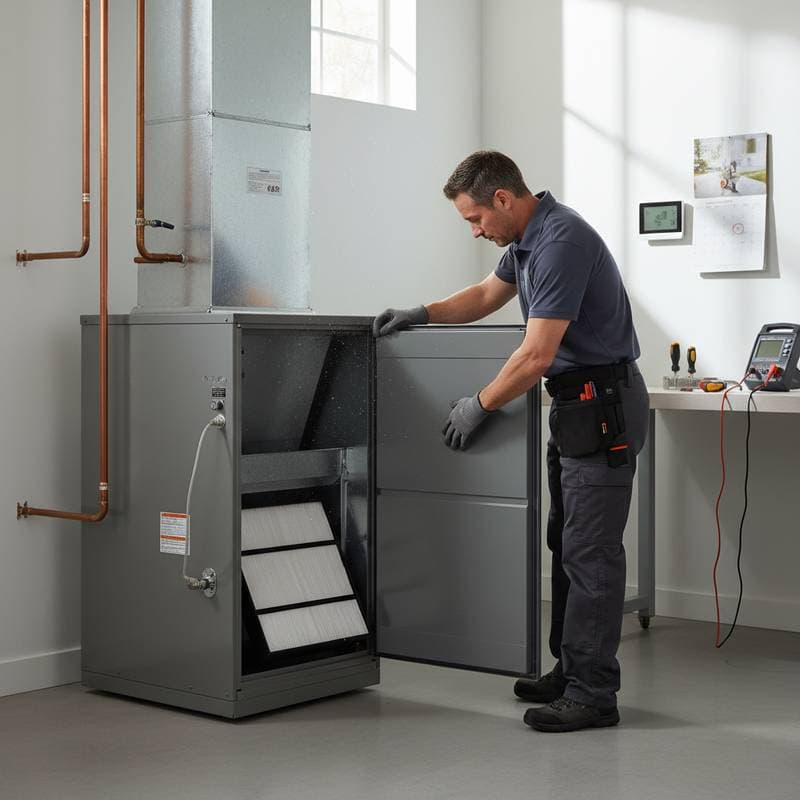
Step 1: Replace or Clean Air Filters
Clogged air filters rank as a primary source of HVAC underperformance. Restricted filters compel the system to labor excessively for air movement, elevating consumption and stressing elements like the blower motor. Autumn introduces extra dust and leaf residue from outdoors, so filter renewal prior to heating activation proves essential.
Procedure:
- Power down the furnace or HVAC unit.
- Extract the existing filter and examine for dirt accumulation or staining.
- Install a fresh filter, ensuring airflow arrows direct toward the blower area.
- Note the installation date to maintain a regular replacement rhythm.
Expert advice: Select filters with MERV ratings from 8 to 11 for typical home setups. Filters with elevated ratings trap finer particles, yet they may impede flow unless suited to the system's specifications.
Step 2: Inspect and Clear Vents and Registers
Blocked vents hinder even heat distribution and force the furnace to overwork. Dust, furniture, or rugs often obstruct registers, reducing efficiency and straining the blower. A thorough inspection ensures unobstructed pathways for warm air.
Procedure:
- Walk through each room to locate supply and return vents.
- Vacuum dust from grilles and surrounding areas.
- Remove any obstructions and straighten bent fins if present.
- Verify that all vents remain open during heating months.
This step alone can improve airflow by 15 percent, according to industry standards, leading to more balanced temperatures and reduced runtime for the system.
Step 3: Test the Thermostat and Consider Upgrades
The thermostat serves as the heating system's control hub. Early testing confirms proper furnace response to cooler conditions. Manual models limit precision, so programmable or smart alternatives offer superior control.
Testing steps:
- Switch to heating mode and adjust the setting well above ambient temperature.
- Listen for furnace ignition; if absent, inspect wiring or breakers.
- Monitor for short cycling, which signals the need for adjustment or new installation.
Devices from brands like Ecobee or Google Nest enable schedule programming, usage monitoring, and remote access. Users frequently achieve 10 percent energy reductions post-installation, as shared in online demonstrations.
Step 4: Examine Ductwork for Leaks and Damage
Leaky ducts waste up to 30 percent of heated air, inflating bills and causing uneven warmth. Fall assessments reveal cracks, loose joints, or insulation gaps before winter demands peak performance. Addressing these issues preserves energy and comfort.
Procedure:
- Access accessible ducts in attics, basements, or crawl spaces.
- Look for visible tears, disconnected sections, or mold signs.
- Seal minor leaks with mastic or foil tape; avoid cloth duct tape.
- Insulate unjacketed ducts in unconditioned areas.
Professional duct testing with smoke or pressure tools provides comprehensive evaluation if DIY limits arise.
Step 5: Clean Around the Outdoor Unit
Though primarily for cooling, the outdoor condenser influences overall system health. Accumulated leaves or debris curb airflow, impacting efficiency across heating and cooling cycles. Pre-winter clearing maintains balance.
Checklist:
- Disconnect power to the unit.
- Remove foliage, twigs, and clippings from a two-foot perimeter.
- Hose fins delicately, directing water inward to outward.
- Confirm the unit sits level with unobstructed drains.
Apply a permeable cover post-cleaning to shield from winter debris. Steer clear of plastic sheeting, which retains moisture and promotes rust.
Step 6: Lubricate Moving Parts and Check the Blower
Friction in motors and fans accelerates wear and hikes energy demands. Lubrication reduces resistance, while blower inspection prevents imbalance. These maintenance acts extend component longevity.
Procedure:
- Consult the owner's manual for lubrication ports on motors and bearings.
- Apply manufacturer-recommended oil sparingly.
- Remove blower access panel to clean blades of dust buildup.
- Balance the wheel if vibrations occur, or call a technician.
Regular lubrication can cut energy use by 5 to 10 percent and quiet operation.
Step 7: Verify Electrical Connections and Safety Features
Frayed wires or loose terminals invite erratic function or halts. Safety mechanisms like limit switches and sensors guard against hazards such as overheating. Fall reviews confirm integrity.
For basic inspection, scan exposed wiring for wear or fading. Label breakers accurately and test carbon monoxide alarms. Technicians perform advanced diagnostics during tune-ups.
Step 8: Inspect the Heat Exchanger and Burners
Cracked heat exchangers pose carbon monoxide risks, while dirty burners impair combustion. Visual checks identify corrosion or soot, essential for safe operation. Professionals use tools for thorough analysis.
Homeowner actions:
- Power off and remove access panels.
- Shine a light to spot cracks or discoloration on the exchanger.
- Brush away loose debris from burners.
- Report findings to a certified service provider.
Early detection averts dangerous failures and ensures clean burning.
Step 9: Arrange a Professional Furnace Inspection
Home efforts cover basics, but experts deliver in-depth scrutiny with specialized equipment. Technicians assess fuel pressure, combustion rates, and venting integrity. They also clean ignition parts and adjust controls.
Benefits include 50 percent fewer urgent repairs, per contractor reports, plus warranty preservation through documented service.
Step 10: Seal Home Air Leaks and Insulate
Gaps around windows, doors, and outlets let heat escape, compelling the HVAC to compensate. Caulking and weatherstripping, combined with added insulation, fortify the envelope. These enhancements amplify system effectiveness.
Focus on attics, basements, and outlets. Programs from utilities often subsidize materials or audits.
Step 11: Evaluate Efficiency and Explore Upgrades
Aging systems over 10 years old or prone to fixes may warrant replacement for long-term savings. Contemporary furnaces feature variable-speed blowers and superior exchangers, achieving 30 percent better efficiency.
Seek Energy Star-certified models for verified standards. Upgraders note bill drops and enhanced comfort; check local incentives for support.
Build Lasting Winter Readiness
Consistent HVAC care fosters reliability and prolongs equipment lifespan. Homeowners gain assurance in facing harsh weather. Implement these fall tasks to secure efficient, safe heating that minimizes costs and maximizes warmth all season.


